 One of the pains of using C++ is how to manage dependencies. The common approach is to manually manage dependencies by either downloading and installing a prebuilt library or compiling it from the source code. While this may seem like the right thing to do, there actually are a lot of pitfalls using this approach: It is cumbersome compile you project on new machines and it is hard to manage libraries shared by multiple local projects. Package managers (like Homebrew and apt-get) and build managers (like CMake) does make things easier, but often still requires some ‘fiddling’ to make things work. I’ll here show how the dependency manager Biicode can be used to solve this problem for a simple SDL2 project. As IDE I use JetBrain’s new CLion.
[Edit: The company behind Biicode just announced its own dead. Biicode will live on as a open source project, but its future is somewhat uncertain. Read more here: Link]
Disclaimer: I’m fairly new to Biicode – the following is mainly a summary of my first steps using the technology. I’m using OS/X, but Windows or Linux should work similarly. I assume that both Biicode (http://www.biicode.com) and CLion (http://jetbrains.com/clion/) has already been installed.
First of all, Biicode should be structured in a certain way (with the ability to configure the structure a bit). The ‘classic layout’ is the following:
+-- myproject/

| +-- bii/

| +-- blocks/

| | +-- owner1/

| | | +-- blockA/

| | | | +-- src/

| | | | +-- include/

| | | | +-- test/

| | | | +-- biicode.conf

| | | | +-- CMakeLists.txt

| +-- deps/
Where ‘myproject’ is the project root, ‘bii’ is the biicode settings, ‘blocks’ is the source code of the project, ‘owner1/blockA’ is the biicode username/project name (used when other refers to the project). It is possible to avoid using the ‘blocks/owner1/blockA’ but this conflicts with CLion.
To create a new Biicode project invoke the following command:
bii init -l clion sdl2test
This will create a new folder called sdl2test. Within this folder create the subfolders ‘blocks/owner1/blockA/src’. Under the ‘src’ folder create a file main.cpp with the following content (also available here):
// Example program:
// Using SDL2 to create an application window

#include "SDL.h"
#include
#include
#include "SDL_opengl.h"


int main(int argc, char* argv[]) {

    SDL_Window *window;                    // Declare a pointer

    SDL_Init(SDL_INIT_VIDEO);              // Initialize SDL2

    SDL_GL_SetAttribute(SDL_GL_CONTEXT_MAJOR_VERSION, 3);
    SDL_GL_SetAttribute(SDL_GL_CONTEXT_MINOR_VERSION, 2);

    SDL_GL_SetAttribute(SDL_GL_CONTEXT_PROFILE_MASK,SDL_GL_CONTEXT_PROFILE_CORE);

    // Create an application window with the following settings:
    window = SDL_CreateWindow(
            "An SDL2 window",                  // window title
            SDL_WINDOWPOS_UNDEFINED,           // initial x position
            SDL_WINDOWPOS_UNDEFINED,           // initial y position
            640,                               // width, in pixels
            480,                               // height, in pixels
            SDL_WINDOW_OPENGL                  // flags - see below
    );

    // Check that the window was successfully made
    if (window == NULL) {
        // In the event that the window could not be made...
        printf("Could not create window: %s\n", SDL_GetError());
        return 1;
    }

    auto glContext = SDL_GL_CreateContext(window);

    std::cout << glGetString(GL_VERSION)<<std::endl;
    std::cout << "OpenGL version "<<glGetString(GL_VERSION)<<"."<<std::endl;
    // The window is open: enter program loop (see SDL_PollEvent)

    SDL_Delay(3000);  // Pause execution for 3000 milliseconds, for example

    SDL_GL_DeleteContext(glContext);

    // Close and destroy the window
    SDL_DestroyWindow(window);

    // Clean up
    SDL_Quit();
    return 0;
}
Now open the project root folder ‘sdl2test’ in CLion. Notice how the main.cpp is not detected as a source file, since the project is not fully configured yet. This can be solved with the command:
bii build
Choosing version of SDL2
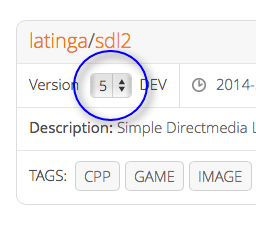
This will generate a CMakeLists.txt file (used by CMake to build the project), which is recognized by CLion and forces the project to be refreshed. However the build is unsuccessful, since SDL.h is not found. To add a dependency to SDL2, we first of all need to find SDL2 as a biicode project by browsing https://www.biicode.com/explore. The project latinga/sdl2 is what we are looking for. Based on the project page we modify the file ‘blocks/owner1/blockA/biicode.conf’ in the following way:
[requirements]

latinga/sdl2: 5

[includes]

SDL.h: latinga/sdl2/include

SDL_opengl.h: latinga/sdl2/include
This configuration file states that the project requires the latinga/sdl2 project in version 5. And that the project uses the header files SDL.h and SDL_opengl.h found in the latinga/sdl2/include folder.
Now it is possible to build the project is using:
bii build
This automatically downloads, compiles and links any dependencies. And finally build our project.
Note that CLion will now have updated its runtime configuration, such that it is possible to run the executable (owner1_blockA_src_main) from the IDE.

Leave a comment